Model Context Protocol (MCP) Guide: Control Your IDE with AI
Published: July 1, 2026 • Written by Alex Rivera • Read Time: 14 min • Word Count: 2,050 words
1. Introduction: The Next Evolution of AI Integration
For the first few years of the AI boom, large language models (LLMs) operated in a vacuum. They were incredibly smart, but they were entirely disconnected from the real world. They couldn't read your local files, query your database, check your API endpoints, or execute terminal commands. If you wanted an AI to help you debug an issue, you had to manually copy-paste code, error logs, and schema definitions into a chat box.
That era is officially over.
In 2026, the **Model Context Protocol (MCP)** has emerged as the open standard for connecting AI models to external data sources and local developer tools. Originally proposed by Anthropic and rapidly adopted by the entire open-source community, MCP provides a secure, uniform protocol that allows AI models to interact directly with your local environment.
Whether you are using Claude Code, Cursor, or custom-built LLM agents, understanding how to configure, build, and secure MCP servers is now a core skill for modern software engineers. This guide will walk you through everything you need to know to master MCP in 2026.
2. What is Model Context Protocol?
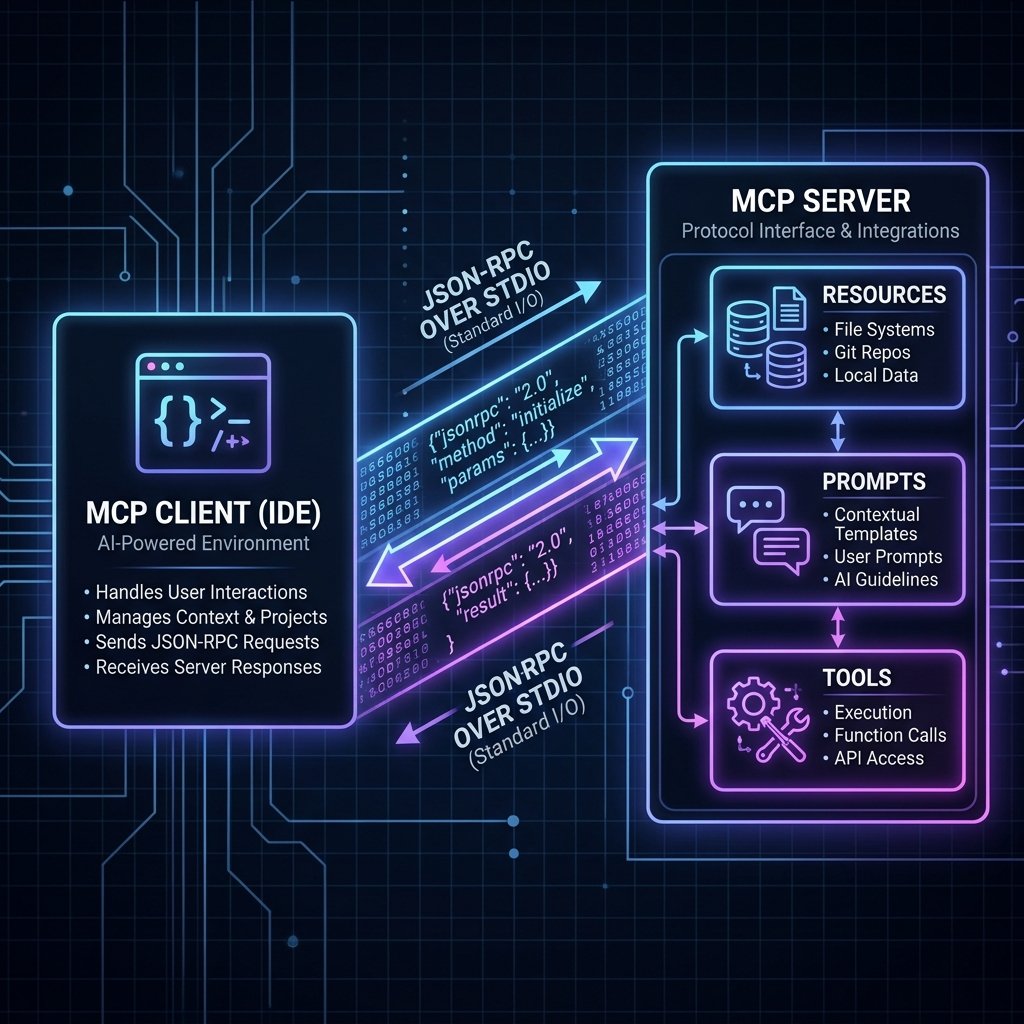
At its core, the **Model Context Protocol (MCP)** is an open-standard, JSON-RPC-based protocol that acts as a secure bridge between an **AI Client** (such as Cursor, Claude Desktop, or Claude Code) and an **MCP Server** (a small, lightweight process running locally or in the cloud).
Before MCP, every AI tool had to write custom, proprietary integrations for every service they wanted to support. If an IDE wanted to support GitHub issues, they had to write custom GitHub integration code. If they wanted to support PostgreSQL, they had to write custom database connection code.
MCP solves this by introducing a **client-server architecture**:
- The MCP Client: The user-facing AI application (e.g., Cursor, Claude Desktop). It is responsible for handling user prompts, managing the LLM's state, and initiating requests to MCP servers.
- The MCP Server: A lightweight service that exposes specific **Resources**, **Prompts**, and **Tools** via a standardized API.
By standardizing this interface, any MCP-compliant client can instantly connect to and utilize any MCP-compliant server.
3. MCP Architecture: Resources, Prompts, and Tools
An MCP Server exposes three primary capabilities to the AI client:
-
Resources (Read-Only Data):
Resources are read-only data sources that the AI can fetch to gain context. Examples include local file contents, database schemas, API documentation, or real-time application logs. Resources are identified by a unique URI (e.g.,
postgres://localhost:5432/schema). -
Prompts (Templates):
Prompts are pre-configured templates that help guide the user's interaction with the AI. For example, an MCP server for code reviews might expose a "Review PR" prompt template that automatically gathers the relevant git diffs and structures the review criteria.
-
Tools (Executable Actions):
Tools are executable functions that allow the AI to perform actions in the real world. Tools have strict JSON schemas defining their parameters. Examples include running a SQL query, executing a terminal command, sending a Slack message, or creating a GitHub issue.
4. Setting Up a Local MCP Server
Setting up an MCP server is incredibly straightforward. Most servers run as simple Node.js or Python processes. Let's look at how to configure the official **PostgreSQL MCP Server** inside Cursor.
First, open your Cursor settings and navigate to **Models → MCP**. Click on **Add New MCP Server**, and configure it with the following parameters:
- Name:
postgres-db - Type:
command - Command:
npx -y @modelcontextprotocol/server-postgres "postgresql://user:password@localhost:5432/mydb"
Once added, Cursor will automatically start the server in the background using standard input/output (stdio) for communication. In your Cursor Chat or Composer, you can now type:
Cursor will detect that the prompt requires database access, call the PostgreSQL MCP server's schema resource, query the tables using the exposed SQL tool, and output the correct query and results instantly.
5. Building a Custom MCP Server in Node.js
While there are hundreds of pre-built MCP servers available for databases, APIs, and dev tools, the real power of MCP comes when you build **custom servers** tailored to your company's internal APIs and workflows.
Let's build a simple, custom MCP server in Node.js that exposes a tool to fetch real-time server health metrics from an internal microservice.
First, initialize a new Node.js project and install the official MCP SDK:
npm init -y
npm install @modelcontextprotocol/sdk
Next, create an `index.js` file and implement the server:
import { Server } from "@modelcontextprotocol/sdk/server/index.js";
import { StdioServerTransport } from "@modelcontextprotocol/sdk/server/stdio.js";
import { CallToolRequestSchema, ListToolsRequestSchema } from "@modelcontextprotocol/sdk/types.js";

// Initialize the MCP Server
const server = new Server({
  name: "internal-metrics-server",
  version: "1.0.0"
}, {
  capabilities: { tools: {} }
});

// 1. List Available Tools
server.setRequestHandler(ListToolsRequestSchema, async () => {
  return {
    tools: [
      {
        name: "get_system_metrics",
        description: "Fetch real-time CPU, memory, and disk metrics for a specific service cluster.",
        inputSchema: {
          type: "object",
          properties: {
            cluster: { type: "string", enum: ["production", "staging"], description: "The target environment cluster" }
          },
          required: ["cluster"]
        }
      }
    ]
  };
});

// 2. Handle Tool Execution
server.setRequestHandler(CallToolRequestSchema, async (request) => {
  if (request.params.name === "get_system_metrics") {
    const { cluster } = request.params.arguments;
    // Simulate fetching metrics from an internal API
    const metrics = {
      cluster,
      cpu_usage_percent: cluster === "production" ? 42.5 : 12.1,
      memory_usage_mb: cluster === "production" ? 8192 : 2048,
      status: "HEALTHY",
      timestamp: new Date().toISOString()
    };

    return {
      content: [{ type: "text", text: JSON.stringify(metrics, null, 2) }]
    };
  }
  throw new Error("Tool not found");
});

// 3. Start Server with Stdio Transport
const transport = new StdioServerTransport();
await server.connect(transport);
You can now register this server in Cursor using the command node /path/to/index.js, and your AI assistant will instantly gain the ability to fetch live system metrics!
6. Security Best Practices for MCP
Giving an AI model access to your local terminal, file system, and databases is incredibly powerful, but it also introduces significant security risks. If you connect an untrusted MCP server, or if your AI client is vulnerable to prompt injection, a malicious actor could theoretically read sensitive environment variables or execute destructive shell commands.
To keep your development environment secure, always follow these critical security guidelines:
-
Use the Principle of Least Privilege:
Never run an MCP server with root or administrator privileges. If a server only needs to read files, do not give it write access. For database servers, connect using a read-only database user with access limited to the specific tables needed.
-
Audit Third-Party MCP Servers:
Before running
npx @some-random/mcp-server, inspect the source code. Ensure it doesn't send your local data or API keys to an external server. -
Enable User Confirmation for Destructive Tools:
Modern IDEs like Cursor and Claude Desktop include a "Require Approval" flag for specific tools. Always enable this for tools that write files, run terminal commands, or modify database schemas.
-
Sanitize Inputs:
If you are building custom MCP servers, always validate and sanitize all inputs. Avoid passing raw user strings directly into shell commands or SQL queries to prevent command injection or SQL injection.
7. Conclusion: Mastering the AI-Native Stack
The Model Context Protocol (MCP) is not just a passing trend; it is the foundational layer of the 2026 AI-native developer stack. By standardizing how AI models interact with data and tools, MCP has unlocked a level of developer productivity that was unimaginable just a few years ago.
By configuring pre-built servers, building custom integrations, and adhering to strict security practices, you can turn your IDE into a highly autonomous, hyper-intelligent engineering partner.
To learn more about optimizing your AI developer workflow, check out our in-depth comparison of Claude Code vs Cursor, or try our interactive .gitignore Generator to streamline your project setup.

About the Author: Alex Rivera
Founder & Editor-in-Chief, The Byte 404
Alex is a former Senior Systems Architect at Netflix and Stripe with over 15 years of experience building high-throughput distributed APIs. He writes about distributed systems, backend performance, and AI-native engineering workflows.